
Whether you want to show off your DIY skills, tragically cracked your glass bong and you don’t have time to look for new bongs for sale, or simply don’t want to spend money on a new water bong, homemade bongs can be a fun project that really pays off. You’ve probably made or at least tried a DIY bong while you were in college and were turned off by the harsh burn you felt during that initial large rip you weren’t prepared for. Luckily, it doesn’t have to be that way and there are many different types of homemade bongs that are quick and easy to build. Despite what some people think, DIY bongs can actually function really well, if not just as good as some store bought bongs (that comes down to your materials and workmanship of course). If you didn’t know, stoners can be pretty crafty when it comes to designing their own smoking devices and figuring out ways to enhance their overall smoking experience.
There are even entire subreddits with hundreds of thousands of members that are dedicated to creating cool and unique DIY bongs, pipes, and other types of smoking accessories and devices (we see you r/stonerengineering). If you’re interested in learning how to construct a makeshift bong, you’ve come to the right place. This article will guide you with a list of materials and step-by-step instructions so you can make your very own gravity bottle bong or mason jar bong in just a few minutes. It’s time to light a blunt and get crafty!
How to make a homemade bong
Don’t be worried, there are many types of homemade bongs that are easy to build, even for those who aren’t great at crafts. While some makeshift bongs can be extremely labor intensive and require specialized tools and cutting glass, there are also basic designs that anyone who knows how to make a hole with a knife can do and they work just as well. Some of the most common DIY bongs are the gravity bong (a classic), apple bong, mason jar bong, and bottle bong. All of these are cheap alternatives if you’ve got your herb ground up and are ready to smoke but realize that you don’t have your own bong.
Here’s how you can easily create two types of homemade bongs in just a few minutes with items you probably already have lying around your house. Go on a hunt to collect the items on the equipment list and follow the simple step-by-step instructions so you can be flying high as the clouds in no time.
How to make gravity bongs
If you’re in a pinch, you can always revert to the classic gravity bong, also known as a waterfall bong. Gravity bongs will almost always get you higher than your average sized glass bong or smoking a joint because the chamber is extra large to accumulate a massive amount of smoke. Also, the action of pushing down the bottle to force the smoke out means it will shoot quickly into your lungs for heavy and immediate effects. This type of homemade bong isn’t for novice smokers (unless you’re ready to get super blazed). A plastic bottle bong may remind you of your days at college and is still one of the easiest and quickest ways to make a homemade bong. Instead of causing suction by inhaling, a gravity bong works by using water and gravity to draw smoke by pulling the water bottle upwards.
This will fill the plastic water bottle with smoke and when the cap is removed and the water bottle is pushed down, the smoke is forced out the top for a big and strong hit. The best part about this kind of water bottle bong is that you probably already have all the equipment needed to create it! Follow these steps to make your own gravity bong in just a few minutes.
Gravity bong equipment list
- Plastic water bottle and cap
- Large 2 liter soda bottle, bucket, or other large container that will fit the water bottle entirely
- Knife or box cutter
- Bong bowl or aluminum foil
- Screwdriver, drill, or other device to make a hole
- Toothpick or paper clip
- Water
- Dry herb
Easy homemade gravity bong instructions
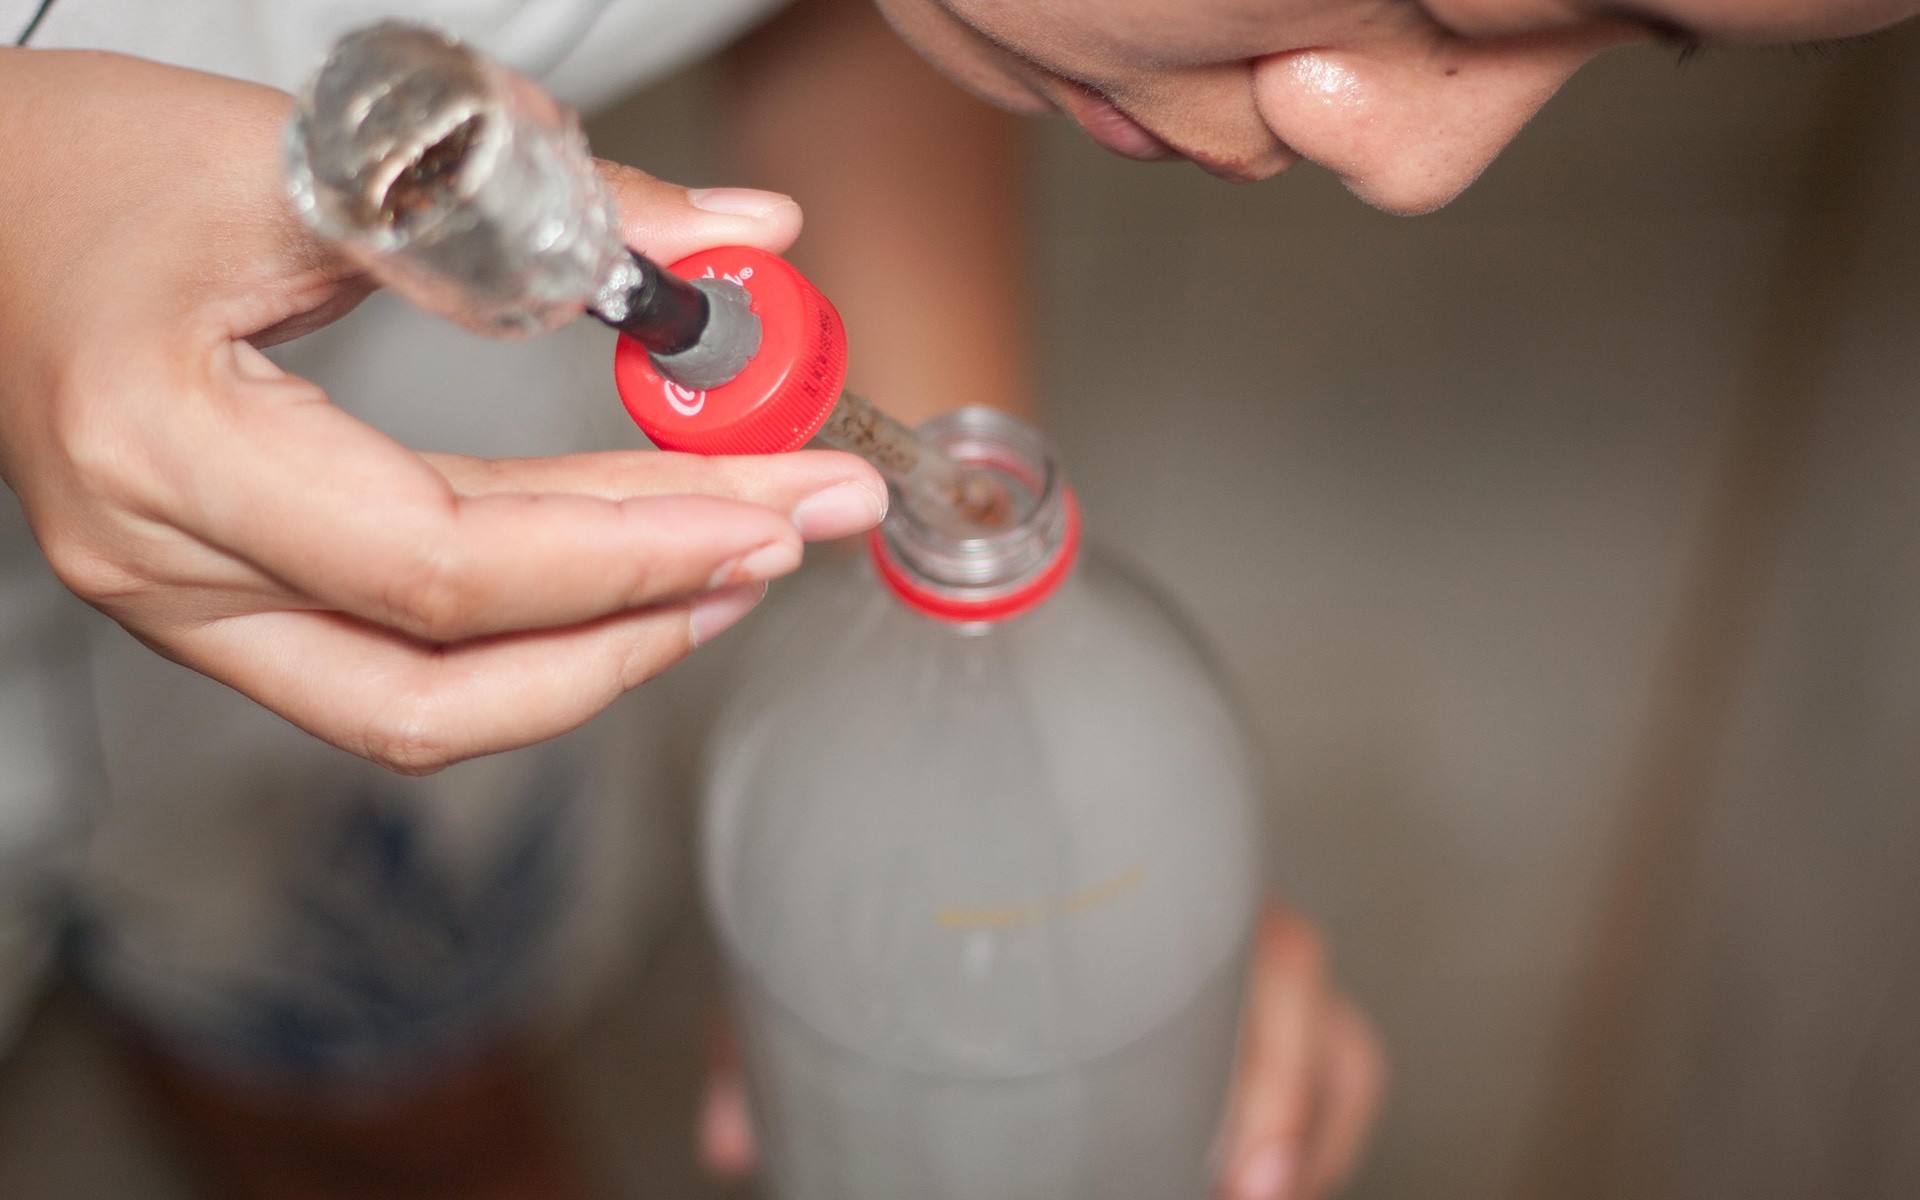
1. Begin by cutting the smaller plastic bottle in half. You’ll only need the top half with the cap, so if you want a larger chamber, make the cut closer to the bottom. For a smaller chamber, cut the plastic bottle closer to the top of the bottle. Set the cut plastic bottle with the cap aside and discard the bottom half.
2. Now it’s time to prepare the bong bowl that will sit on the bottle cap. It’s best if you use a glass bowl from another bong, which you can purchase for less than $5. If you have a bong bowl, use a sharp knife and a device such as a screwdriver to create a hole in the bottle cap. Be sure that the hole is just big enough for the bowl joint to fit tightly inside. It should not be loose or have any gaps between the bottle cap and the joint where smoke can escape. Alternatively, if you don’t have a bong bowl handy, you can create a disposable bowl out of aluminum foil. To do this, create a large hole in the bottle cap (the size for this technique doesn’t matter since there’s no joint). Cut two squares of aluminum foil that are just a little bit larger than the bottle cap. Place the two squares of foil on top of each other so you have a thicker bowl and start to mold the foil over the bottle cap, pushing down where you created the hole to create a depression that can hold the ground herb. Once the bowl is molded, use a toothpick or paperclip to carefully poke tiny holes throughout the bottom of the bowl. It’s easy to accidentally punch right through the foil or make too large a hole, so do this step with care and leave extra space between each hole. This is how the smoke will be drawn into the chamber so you will want to have enough small holes to allow the smoke to pass through.
3. Now that your chamber and bowl is ready to go, it’s time to fill up the large bucket or other container with water. With the cap removed, put the cut plastic bottle inside the larger container and fill it with water so just the bottle and not the neck is covered. Don’t over fill the container since you will be pushing the bottle up and down inside the water and it could unintentionally overflow or worse, wet your herb!
4. Pack the bowl just as you would when using a normal water bong. Grind up the cannabis flower into uniform pieces and place it inside the glass or aluminum bowl with a little tamp. With the plastic bottle submerged in the larger container (this is key), twist on the bottle cap to secure it in place. Do not try to put the bowl and cap on before pushing the water bottle bong into the water completely. If you do this, the force will push the dry herb right out of the bowl and probably into the water.
5. With the cap and bowl in place and the chamber submerged, use one hand to hold the water bottle down in the water and another to light the bowl. When the bowl is lit and you begin to see smoke, in a smooth motion, slowly lift the water bottle bong out of the water to draw smoke from the bowl into the chamber. Don’t let the open bottom of the chamber go out of the water or the smoke will escape! This slow lifting action creates a vacuum similar to the suction caused when inhaling through a bong mouthpiece.
6. Now that the smoke has accumulated in the chamber, twist off the cap which removes the bowl. Immediately place your lips over the opening of the plastic bottle and slowly push the bottle down into the water again. Be ready when you push down because the water will force the smoke out into your throat and lungs. If the homemade water bottle bong produces too big of a hit and you can’t clear the entire chamber, simply screw the cap with the bowl back onto the mouthpiece hole and keep the bottom of the bottle in the water. When you’re ready for another bong rip, unscrew the cap and repeat this step.

How to make glass bongs
No, you won’t be learning how to become a glassblower, but you can easily make a homemade bong using a mason jar or any other glass jar with a metal lid. It’s the perfect way to upcycle used salsa or pasta sauce jars (sustainability at its finest). While the mason jar bong is a little more complicated to make than a plastic bottle bong and you probably don’t have all the necessary equipment, it will last a lot longer, won’t take up as much space, and is fairly portable. One thing to remember when building this style of bong is to find heat-safe materials that are lead free and to create the proper seal. Here’s a step-by-step guide so you can make your very own homemade weed bong for just a few bucks:
Mason jar bong equipment list
- Mason jar or any other clean glass jar with a metal lid
- Glass bong bowl
- Compatible downstem
- Vinyl tubing, hose, or heat-safe reusable metal straw
- Rubber grommets, tape or silicone sealant
- Knife or drill
- Water
Mason jar homemade bong instructions
1. Get your upcycled mason jar and remove the lid. Using a sharp knife or drill, make three holes in the metal lid. One is the carb, one will fit the downstem and rubber grommet, and the third hole will need to fit a rubber grommet and the vinyl tubing or whatever you choose to use as a mouthpiece. Heat-safe reusable metal straws also make great mouthpieces. If you accidentally make the hole too big, you can seal it with duct or electrical tape or some silicone sealant so the DIY bong is airtight.
2. Push the vinyl tubing through the hole so that it’s just flush with the underside of the metal cover and secure it in place. You don’t want the mouthpiece to be too close to the water to avoid splashback and drinking dirty bong water. Next attach the downstem by pushing it through the hole in the lid. The downstem should reach fairly close to the bottom of the glass jar when the lid is closed. Secure it with a rubber grommet or silicone sealant. If the edges of your carb hole is sharp, you can line it with tape or pop in a compatible rubber grommet.3. It’s time to fill up your homemade bong with water and give it a test run! Pour in enough water to cover the bottom of the downstem entirely. Screw on the lid and give the mouthpiece a strong pull. If you could feel water during the inhale, you filled it a little too much and will need to dump some water out. If not, you’re ready to pack a bowl and light up!
4. Pack the bong bowl with evenly ground dry herb and give it a little tamp. With the carb hole covered, light the glass bowl and slowly inhale through the mouthpiece. You should see bubbles produced by the downstem. When the chamber of your homemade water bong is filled with smoke, remove your finger from the carb to create an open airpath and you’ll be able to clear the bong with a strong toke on the mouthpiece.
Water bongs for sale
Not ready to take the time to make a DIY bong from scratch? You’re far from alone. Visit the Everything For 420 online head shop where you’ll find the best prices on glass bongs, silicone bongs, mini bongs, accessories like bowls, and more!
Content Disclaimer:
The information does not constitute advice or an offer to buy. Any purchase made from the above press release is made at your own risk. Consult an expert advisor/health professional before any such purchase. Any purchase made from this link is subject to the final terms and conditions of the website’s selling as mentioned in the above as source. The Advertising Agency and its downstream distribution partners do not take any responsibility directly or indirectly. If you have any complaints or copyright issues related to this article, kindly contact the company this news is about.