
[ad_1]
There sure is a lot of skydiving in The Legend of Zelda: Tears of the Kingdom. But good news: Paragliders, Zonai Wings, and other fascinating Ultrahanded contraptions aren’t your only means of improving Link’s ability to soar through air. Consisting of three pieces of armor, the Glide set improves your skydive mobility and cuts back on how much stamina paragliding will soak up.
Getting the full Glide set, however, isn’t a matter of walking into a shop and shelling out some rupees. You’ll have to go through a set of trials, but to even get to those, you’ll likely need to unlock some towers and traverse some treacherous terrain. We’ll go over all those details by the end of this guide so you’ll know exactly where to go and what to do to get yourself the Glide Shirt, Tights, and Mask.
Read More: 15 Things I Wish I Knew Before Starting Zelda: Tears of the Kingdom
To accomplish the quest to assemble all pieces of the Glide armor set, its best to max your stamina a reasonable amount (say two or three stamina vessels just to be sure). Or you can whip up some food or elixirs to either replenish your stamina or temporary increase your limits. You’ll be ascending some high heights, so more stamina is more better. Also, it pays to have some good snow gear—which I’ll cover here—so this guide will actually net you two full armor sets if you follow everything. Let’s get started.
Tears of the Kingdom: How to get the Glide Shirt from Courage Island
The Glide shirt is probably easiest to start with. We need to get to Courage Island. Head to Lindor’s Brow Skyview Tower, which is Northwest of Lookout Landing (along the way you can also chat with Hestu if you haven’t done so already).
Read More: Where the Heck is Tears of the Kingdom’s Hestu, The Korok Trader?
If this isn’t your first attempt at activating a new tower, then you’ll know many of them require a short side quest to get working. The Lindor’s Brow Tower stands on a lone, raised island in the middle of a lake. Fear not, this is one of the easier towers to unlock. All you need to do is position yourself south of the tower and look to your left to see a bundle of lumber. Ultrahand some planks together to build yourself a simple bridge and mosey on up to the tower to get it activated.
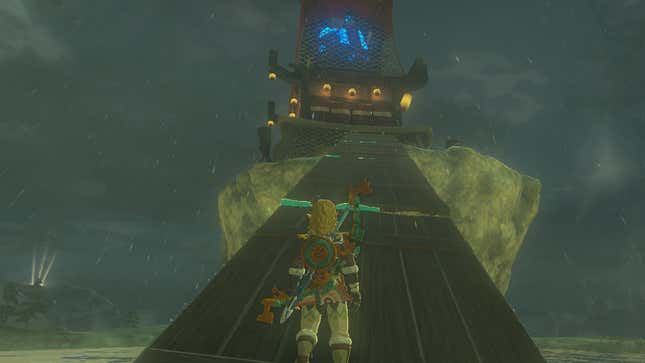
Once you’re up in the air, you’ll want to head southwest. You’re looking for a set of ring-shaped sky islands that rises up like a giant column (this will be true of all three areas for the Glide set). Land on the island beneath the rings, the one with the big circular pool of water, and have a chat with a Steward Construct nearby. They’ll tell you about a Dive Ceremony and will ask you to go for a trial dive first. The trial run will unlock the actual test to get you the Glide shirt (as well as the Shrine on this island).
Note: You can initiate this dive trial on your own by heading for the island at the top of the column of rings, but the Construct will send you up there anyway. It’s up to you which way you’d like to start.
Each attempt at the Dive Ceremony costs one Zonai Charge. If you run out of them, this Steward Construct will let you get one free attempt (just don’t tell anyone). If you need to hop off the island to collect more Zonai Charges, the nearby Shrine is a quick and easy fast travel point to get your way back to the island without needing to launch from the tower again.
As you’ll see from the trial, this is a pretty straightforward test of aerial maneuvers. You’ll have 35 seconds to get through each of the green rings. Make sure you dive off the first platform and don’t just fall. But here’s a trick you might not have figured out yet: Holding R will initiate a dive and will speed up your descent rapidly. This technique isn’t totally essential on this first ceremony, but the ones for the Tights and Mask will require it if you want to finish within the allotted time.
Make it down to the pool of water in time and the Steward Construct will reward you with the Glide shirt. Depending on how fast you complete this ceremony, they may ask you to go for a second trip through the ceremony, this time finishing it in 20 seconds. Doing so will net you a Large Zonai Charge.
Tears of the Kingdom: How to Get the Glide Tights From Bravery Island
To get the Glide tights, we’ll need to go to Bravery Island, located in the North Hyrule Sky Archipelago. As you might’ve guessed, a Skyview Tower is the best way to get there (and with improved skydive mobility from the Glide shirt, it’ll be even easier this time).
From Lookout Landing, make your way north, past Hyrule Castle and the Great Hyrule Forest. As you approach the Thyplo Ruins Skyview Tower, you’ll probably be able to gather why it won’t be functioning just right upon your arrival. A moveable platform is blocking the exit point.
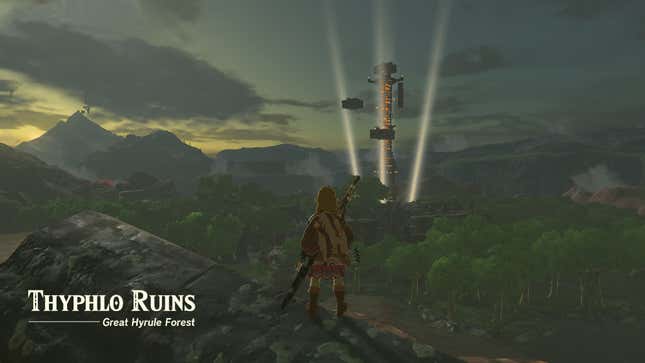
As you reach the tower, you can have a chat with our pal Billson, who is utterly perplexed as to why the tower won’t work. Lucky for Billison, you’re there to make his job much easier. But you’ll need to get to the top of the tower to fix the issue.
How you get up there is up to your own creativity, of course. If you’ve got some decent stamina, you could just climb the tower, but there are also floating platforms with rockets on them. You can reach the lowest hanging one with Ascend and can then move these platforms with Ultrahand, and fix rockets to various sides of them. Use these to get your way to the top and move the platform blocking the exit chute of the tower. Then head on down to deliver Billson the good news and get ready to fly once more.
Getting to Bravery Island is a little trickier than Courage Island. Bravery Island is south of the Thyplo Ruins Skyview Tower, and as you’ll see once in the air, the column of rings is a bit too far to reach with just the paraglider (though you can reach it directly with this slick Zonai Wing trick).
Read More: This Tears of the Kingdom Paraglider Trick Basically Lets You Fly Forever
If you’re not using the Zonai Wing trick, you’ll need to do some island hopping. Start with the closest island you can land on: It’s shaped like a wheel with four spokes (one slanted) sticking out. Here you’ll find a dispenser and the Mayam Shrine, which you’ll need to activate by getting the crystal from the Flux Construct I up ahead.
Move south to the next island and, should you choose, you can get yourself into a little boss fight against a Flux Construct I. This boss isn’t terribly complicated. Strike the glowing cube to damage it. It will morph into different forms with each phase, causing you to change up your strategy. Depending on your armor and health level, the Flux Construct can kill you quick, so keep your distance and make use of arrows equipped with monster eyes to more reliably land your strikes. I also found that Zonai Beam-fused weapons did generous damage to its weak point.
Whether you dispense with the Flux Construct or not, you can head south to the base of the next Dive Ceremony, chat with the Steward Construct to initiate the first trial run (and unlock the Simosiwak Shrine) then get ready for a slightly more challenging dive.
First, make sure the Glide shirt is equipped as it’s going to prove enormously helpful here. You will also need to hold R at various points to speed up your descent or you will simply never make it to the bottom in just 35 seconds. Since the Rings move, notice the falling green orb to predict the next one’s location, then hit and hold R above each one to speed through it. This one might take you a try or two.
Tears of the Kingdom: How to get the Glide Mask from Valor Island
Lastly, we have the bird-lookin’ Glide mask. To get this, be ready to hike through some unreasonably cold weather—the kind that a handful of cooked peppers won’t save you from. Head to Mount Lanayru Skyview Tower. This is located southeast from Lookout Landing. But given the deathly cold weather, you’re gonna need some warm clothes and for that, we’re taking a hike to Rito Village, and make sure you’ve got a good chunk of rupees, roughly 2,150 if you want to be as protected from the cold as possible.
To get to Rito Village, head Northwest from Lindor’s Skyview Tower (the first tower we used to get the Glide shirt). It’s gonna be cold here too, but some cooked peppers should help you out (and shield surfing is a great way to get around in this area too).
Read More: Tears of the Kingdom Made Shield Surfing Even Better
Rito Village has a broken bridge prohibiting you from getting there. You can either Ultrahand some kinda solution, toss a Hylian pine cone into a nearby campfire to create an updraft you can paraglide up from, or use a Zonai Spring to get the height necessary to reach Rito Village.
Once there, ascend to Brazen Beak armor shop and grab the Snowquill armor set. It’s pricey, but there are a number of reliable ways to farm for rupees which you can read about here.
Read More: 4 Great Ways To Farm Tears of the Kingdom Rupees and More
You can get by with just the Tunic and Trousers (or just the Tunic and the Archaic Warm Greaves located near the Gutanbac Shrine on Great Sky Island), but if you’re like me, you’ll have irresistible compulsion to get the whole set (you are reading a guide to get the whole Glide set afterall, aren’t you?). Once you’ve got your snow gear, get ready to trek all the way back southeast to Mount Lanayru Skyview Tower.
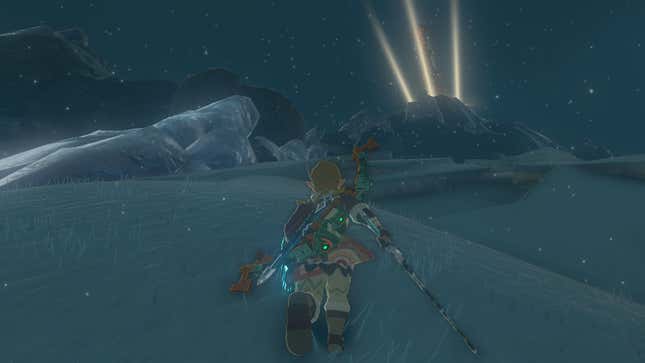
The biggest challenge here is the climb and the cold. With the Snowquill armor set, the cold won’t bother you, but you might want to consider grinding some Shrines to up your stamina to at least make the trek to Mount Lanayru’s tower easier.
Once you reach the summit, get ready to deal with another problem….not! You can just open the doors, hit the terminal, and hop on the launcher in this one. Thankfully not every Skyview Tower is in shambles in Hyrule.
Valor Island is northeast of the tower, so ascend, let Link do his scan thing if you haven’t already, and then get ready for some light island hopping similar to the trip to Bravery Island. Once again, you’re looking for a giant column of ringed Sky Islands. Hit the base of it with the pool, chat with the Steward Construct to initiate the free trial, and then get ready to dive again.
Don’t forget to reequip your Glide shirt and tights. After climbing Mount Lanayru, you might still have your snow gear on. I personally found Valor Island’s Dive Ceremony easier than Bravery Island. Hold down R when appropriate to gain the most speed and beat the 35-second requirement. Once you splash down into the pool, you’ll chat with the Steward Construct yet again and, provided you clear the time, you’ll be awarded the Glide mask.
Given just how much time is spent jumping off Sky Islands and traversing long distances with the paraglider, the Glide armor set is one of the most essential ensembles to gather. And, in the process, you’ll also need a Snowquill armor set (or some equivalent to it), so you’ll come out of this trip with two great armor sets to set out and explore even more of Hyrule.
[ad_2]
Source link