
Chhena poda recipe with step by step pics. Chhena Poda or Chenna Poda is one of the much-celebrated sweet dishes from the beautiful state of Odisha. Its made with chenna or fresh paneer, sugar and flavorings. The ingredient list of the Chhena Poda Recipe is minimal, but then, it does take some time to get done as it has to be baked. The classic preparation actually uses a chulha (small earthen/brick stove). Since at home, you bake it in an oven, it can also be referred to a paneer cake.
Chena poda literally translates to roasted cheese in the English language. Its also said that chhena poda is the favorite sweet of Lord Jagannath (The presiding deity of Puri Jagannath temple in Odisha). Chena poda is also made during festivals like Diwali or Durga puja.
A few years back I had got some recipe requests to share the chappan bhog recipes (56 dishes) that is offered to Lord Jagannath. I have the complete list of the dishes and do plan to add them one by one. So the best way is to start with a sweet dish and that too Lord Jagannath’s favorite sweet.
Making chhena poda is very easy. You will be surprised by the factor of simplicity and ease in this recipe. Unlike other baking recipes which involve two to three steps, this one is a one-bowl recipe.
Also while baking cakes things do go wrong, but you cannot go wrong when making this delicious paneer cake. That is the hallmark of this recipe. Halving, doubling and tripling the quantities of this recipe is possible.
To make chenna poda you can use fresh paneer or fresh chenna. You can even use store brought paneer. I used paneer which was made a day before. Though freshly made chenna can also be used.
I have made this recipe a couple of times and each time it has been good. When baking the sugar gets caramelized and gives such a good taste. When I started making the recipe I referred to a few cookbooks. Once I got the knack of the recipe, I adapted it largely to suit our tastebuds. The recipe can be easily halved, doubled or tripled.
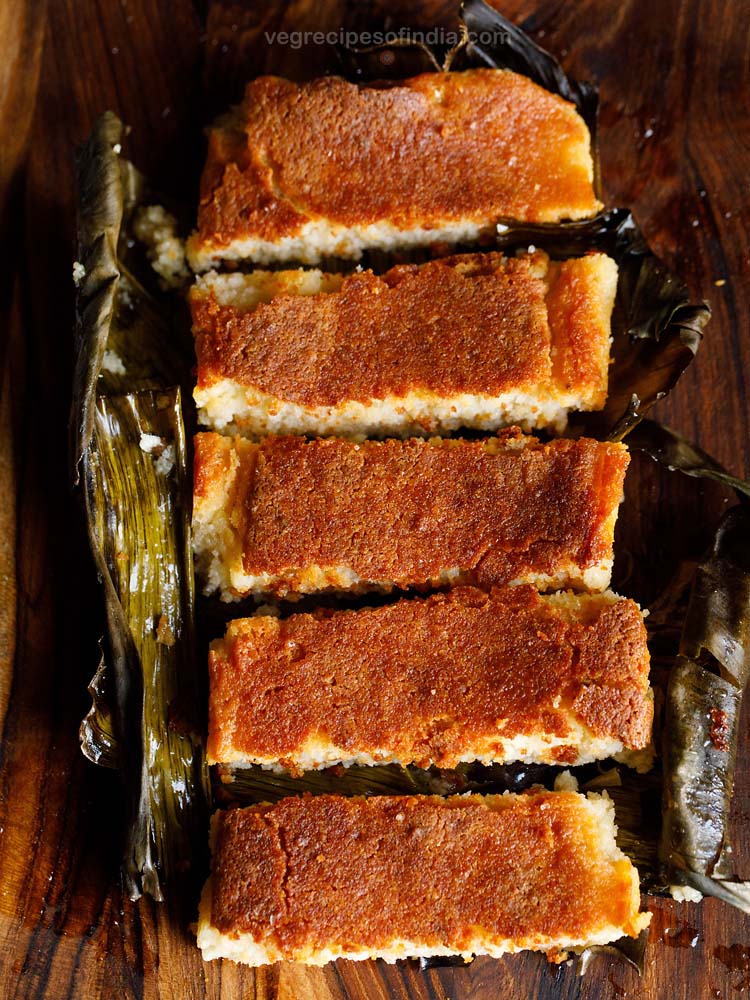
In Odisha, chena poda is baked in sal leaves which gives chhena poda a distinct flavor. Since I had banana leaves, I used banana leaves to bake. Though you can even skip banana leaves and simply bake in a pan.
You can bake chenna poda in an oven and even in a pressure cooker. In a pressure cooker baking chena poda will take about 25 to 35 minutes. If you want to use a pressure cooker, then the check the method here – Cooker cake
Serve chenna poda as a sweet snack or an after meal dessert. You can even offer it your deity as bhog or naivdeyam.
If you plan to offer chena poda to your deity then use homemade paneer instead of store bought paneer and make it with devotion and love.
Step-by-Step Guide
How to make Chenna Poda
1. Firstly line a baking pan with some chopped banana leaves. Grease the banana leaves with some ghee. You can also use butter paper or parchment paper instead of banana leaves. Or you can skip everything and just grease the pan with ghee on all sides.
Also preheat oven at 180 degrees celsius for 15 minutes.
2. Then take the 250 grams of fresh paneer or chenna and crumble it very well.
3. Then add ½ cup sugar. You can also use ½ cup jaggery powder instead of sugar.
4. With clean hands mix sugar with the chenna.
5. Then continue to mash and knead the paneer or chenna like the way you would knead a chapati dough.
6. The paneer mixture has to become loose, light and with a cake batter like consistency. The more light and softer the consistency, the better the chenna poda tastes.
You can see the consistency below. I have not added any milk or water. In case the mixture looks dry, then you can add a few tablespoons of milk or water. Some amount of fat is released while mashing chenna and thats fine.
7. Once you get a batter like consistency in the paneer mixture, then add ½ teaspoon cardamom powder and ½ tablespoon rice flour.
Optionally a pinch of baking soda can also be added, but does not make any difference. Instead of rice flour, you can also use fine rava (sooji). Some chopped dry fruits like cashews, almonds and raisins can also be added.
Baking chenna poda
8. Pour the chhena poda mixture in the pan. Shake the pan gently so that the chenna poda mixture spreads evenly. Level the top with a spatula.
9. Place the pan in the oven and bake chena poda for 30 to 45 minutes. If using OTG, use the toast mode and keep pan in the center. Bake chhena poda till the top crust gets a dark golden color.
Oven times vary, so do keep a check. In some ovens baking this paneer cake can even take less time. I am giving an average time that will work for most ovens.
10. Remove chhena poda from the oven once done.
11. Then check with a bamboo skewer or toothpick and it should be clean. There should be no sticky batter on the toothpick.
12. Let the chhena poda cool completely in the pan. Then remove it.
13. You can slice and then serve chhena poda. Leftover can be refrigerated for 2 to 3 days.
14. Serve chhena poda as dessert after meals or as a sweet snack.
More Diwali sweets
Please be sure to rate the recipe in the recipe card or leave a comment below if you have made it. For more veetarian inspirations, Sign Up for my emails or follow me on Instagram, Youtube, Facebook, Pinterest or Twitter.

Chhena Poda | Chenna Poda
Chenna poda is a popular sweet from odisha. Its made with chenna or fresh paneer. The entire dish is baked and can also be called as paneer cake.
Prep Time 10 mins
Cook Time 30 mins
Total Time 40 mins
Prevent your screen from going dark while making the recipe
preparation
Firstly line a baking pan with some chopped banana leaves. Grease the banana leaves with some ghee.
You can also use butter paper or parchment paper instead of banana leaves. Or you can skip everything and just grease the pan with ghee on all sides.
Also preheat oven at 180 degrees celsius for 15 minutes.
making chhena poda mixture
Then take the 250 grams fresh paneer or chenna and crumble it very well.
Then add ½ cup sugar. You can also use ½ cup jaggery powder instead of sugar.
With clean hands mix sugar with the chenna.
Then continue to mash and knead the paneer or chenna like the way you would knead a chapati dough.
The paneer mixture has to become loose, light and with a cake batter like consistency. The more light and softer the consistency, the better the chhena poda tastes.
I have not added any milk or water. In case the mixture looks dry, then you can add a few tablespoons of milk or water. Some amount of fat is released while mashing chenna and thats fine.
Once you get a cake batter like consistency in the paneer mixture, then add ½ teaspoon cardamom powder and ½ tablespoon rice flour. Optionally a pinch of baking soda can also be added, but does not make any difference. Instead of rice flour, you can also use fine rava (sooji). Some chopped dry fruits like cashews, almonds and raisins can also be added.
baking chhena poda
Pour the chhena poda mixture in the pan. Shake the pan gently so that the chenna poda mixture spreads evenly. Level the top with a spatula.
Place the pan in the oven and bake chena poda for 30 to 45 minutes. If using otg, use the toast mode and keep pan in the center. Bake chena poda till the top crust gets a dark golden color. Oven times vary, so do keep a check. In some ovens this paneer cake can even take less time. I am giving an average time that will work for most ovens.
Remove from the oven once done.
Then check with a bamboo skewer or toothpick and it should be clean. There should be no sticky batter on the toothpick.
Let the paneer cake cool completely in the pan. Then remove it.
You can slice and then serve chenna poda. Leftover can be refrigerated for 2 to 3 days.
Serve chhena poda as dessert after meals or as a sweet snack.
- The recipe can be easily halved, doubled or tripled.
Nutrition Facts
Chhena Poda | Chenna Poda
Amount Per Serving
Calories 195 Calories from Fat 99
% Daily Value*
Fat 11g17%
Saturated Fat 6g38%
Cholesterol 29mg10%
Sodium 10mg0%
Carbohydrates 18g6%
Sugar 16g18%
Protein 5g10%
Calcium 200mg20%
* Percent Daily Values are based on a 2000 calorie diet.
This Chhena poda recipe post from archives first published in October 2017 has been updated and republished on January 2023.
[ad_2]
Source link